G-code output format #335
Comments
|
Wow, so cool! I've heard of people doing this but never spoken to someone who made one. I would love to see pictures and/or video if you are interested in sharing :) We switched from using libembroidery to a new Python version, pyembroidery awhile back, and that's when we lost the .TXT format. To be honest, I didn't realize anyone was using it! Sorry about that. There are a couple of options here. We could add in a .TXT format to pyembroidery, although it does already have a .CSV format that you can access through the Embroider extension's dropdown menu. It's likely that your friend's program could be modified pretty easily to use .CSV files instead of .TXT. Are they available to re-code the conversion program? Another option is to add a G-code output format to pyembroidery. I really like this idea because it would help out other folks that want to make their own embroidery machine like you did. It's been a very long time since I looked at G-code, so I'd need a refresher on how it's formatted. If your friend would be willing, could you post the conversion program here? I could use that to write a G-Code output plugin for pyembroidery and release a new version of Ink/Stitch. Also, if you're up for it, it would be super cool if you wrote up a bit about how you created your embroidery machine. We'd be happy to provide space on https://inkstitch.org/ if you wanted to go that route. I love the idea of an open source embroidery machine powered by open source software. :) Our web source files are here though I'm sure we could help you with formatting if you're not familiar with Jekyll and/or markdown. Welcome to the Ink/Stitch community :) |
|
I hadn't ever used the .txt format, but wouldn't it have been formatted the same as a CSV with how it used/displayed the info? I could be wrong, only reason why I'm thinking this is that I use simple text editors when manipulating the CSV file. |
|
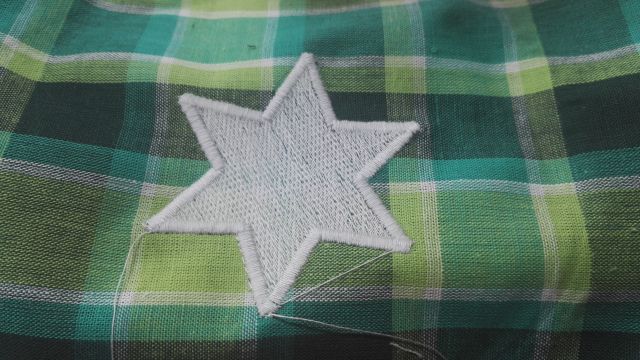
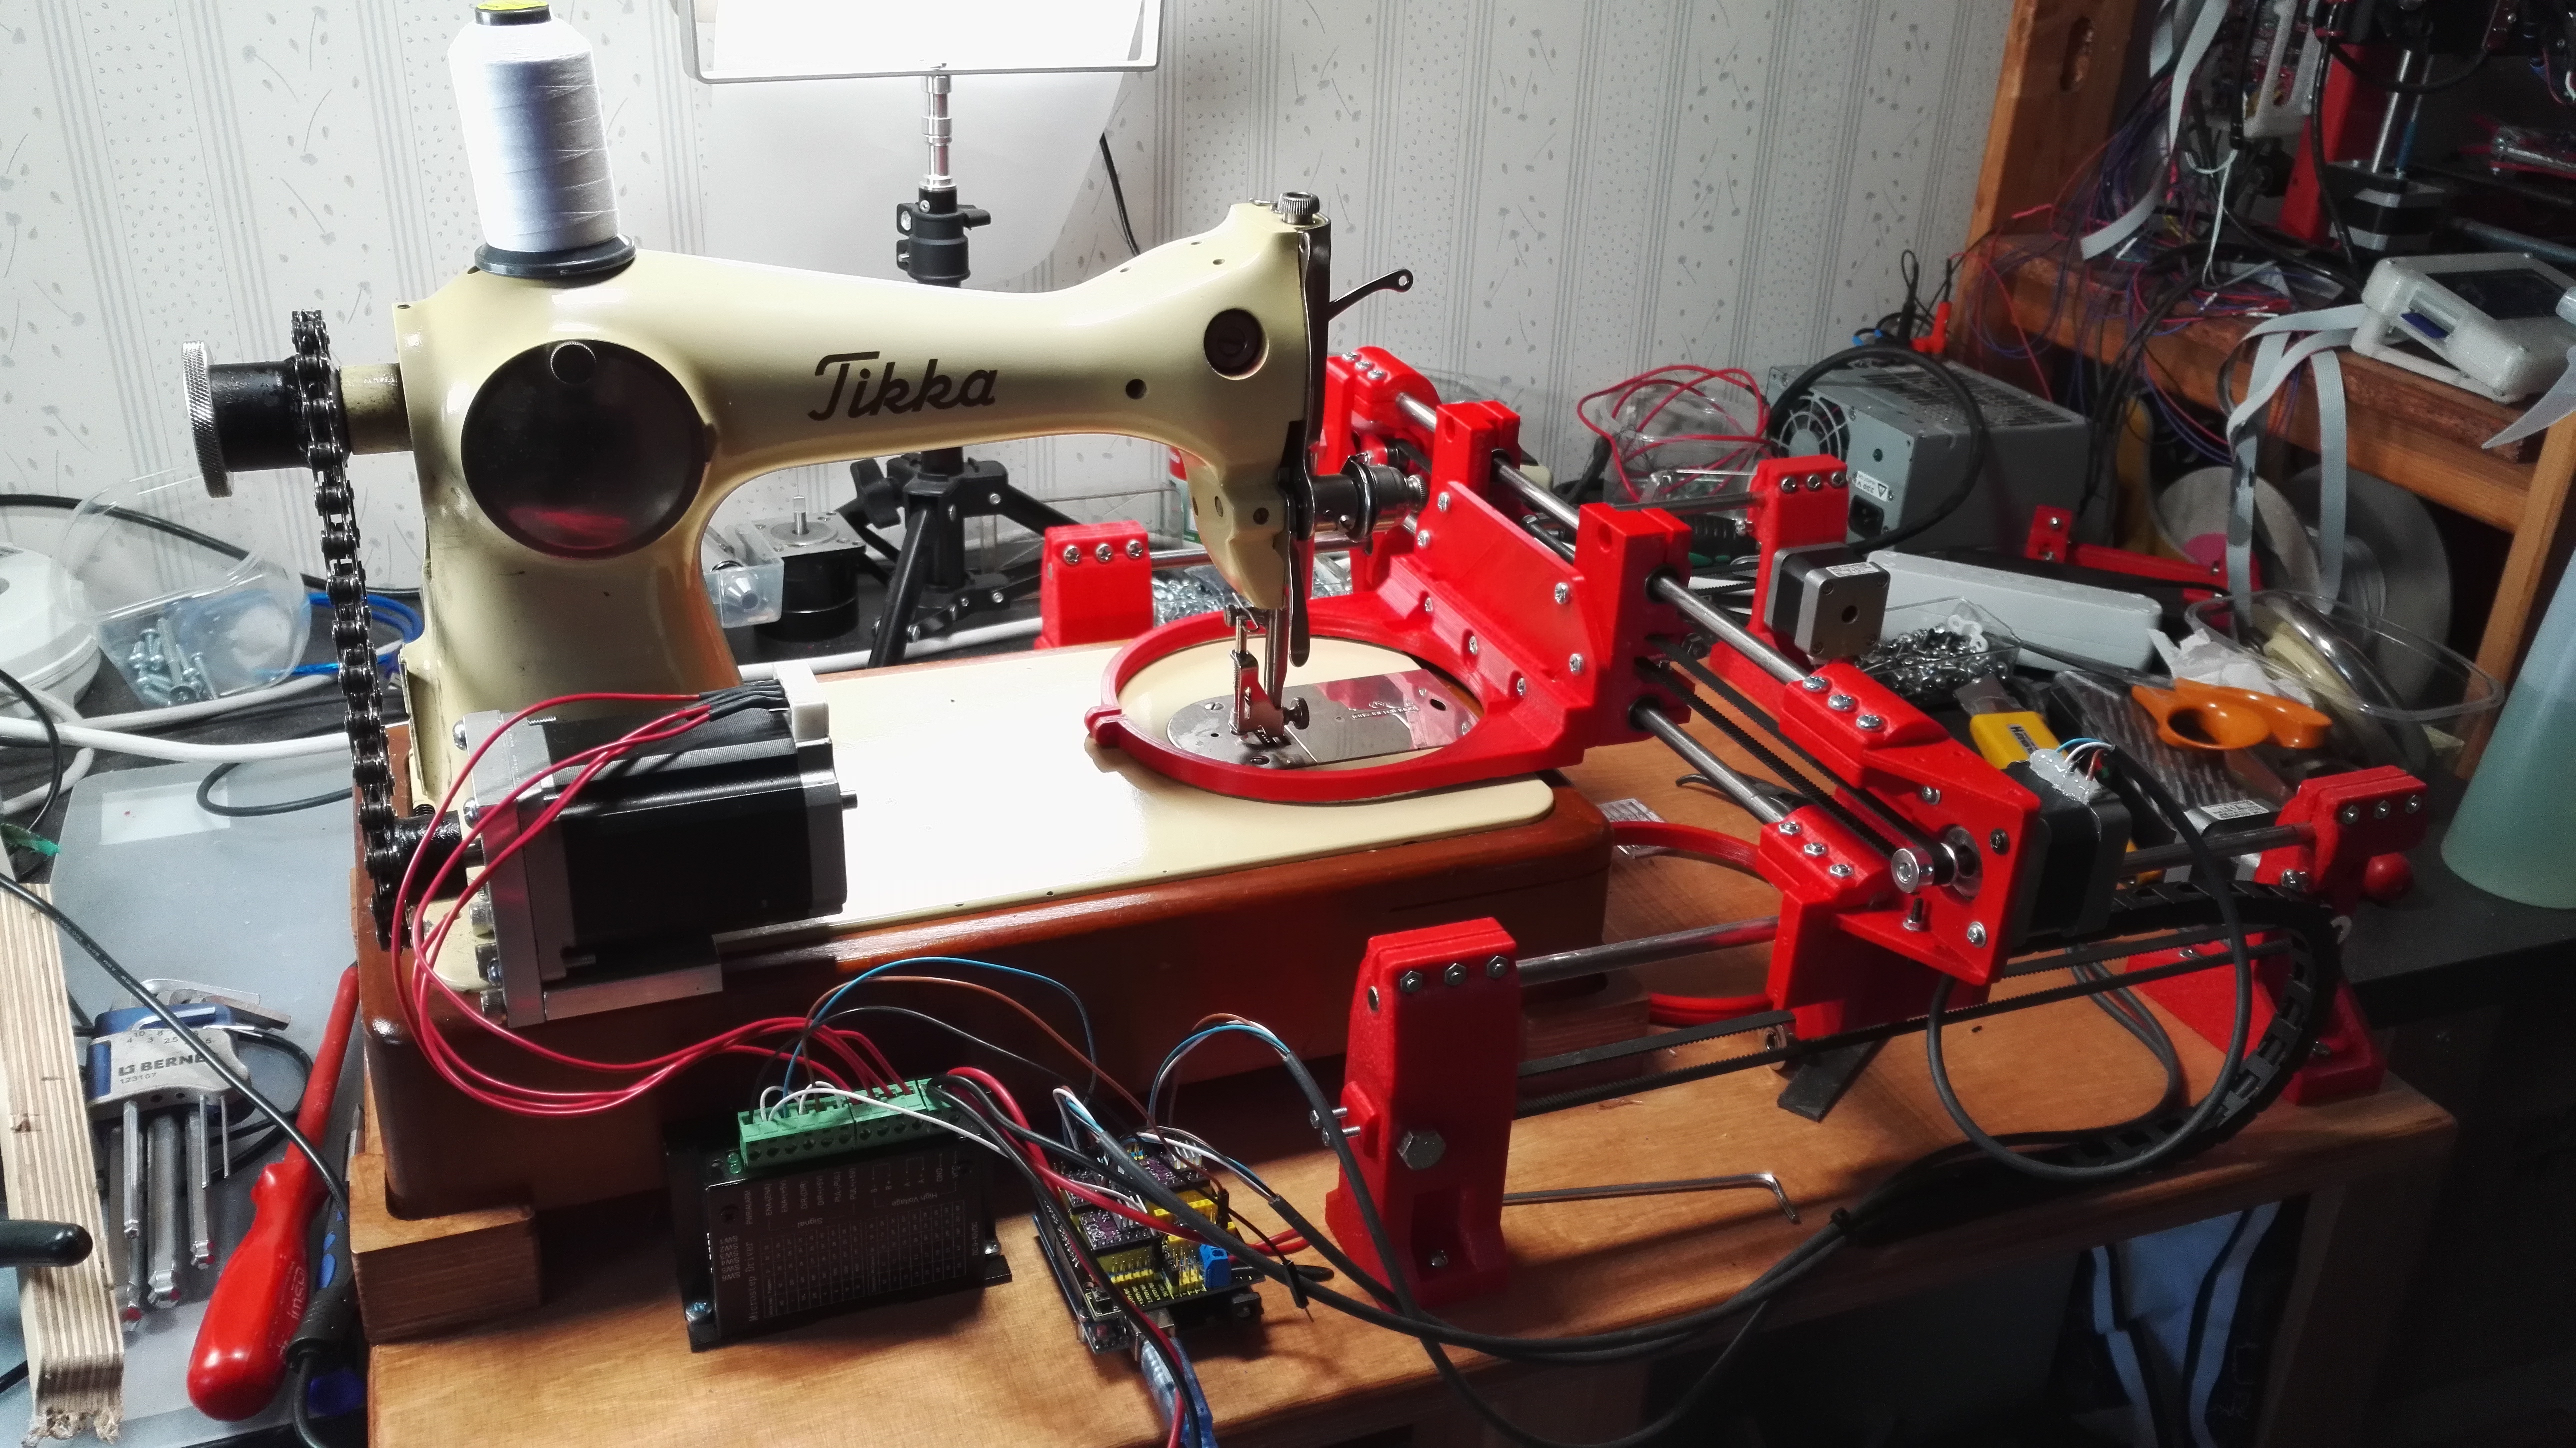
Pictures, yes I can do that. This is still work in progress, currently this works as it should, but I'm not happy about changing hoop or height of Y axis. I will turn these on side 90 degrees, so it will be lower and hoop will be nearly quick release. This is actually fully 3D printed, slides are 8mm stainless rods (L=400mm) with suitable linear bearings, nema 17 steppers move and actual brain is Arduino Uno with GRBL shield. Separate nema23 runs sewing machine. Runs with 12V power and connects to computer with USB. I think this is very easy to duplicate. This is my fourth UNO/GRBL machine, so nothing new, but getting G-code to stitch well that's new thing. Biggest limitation is G-code, because it is exact, sewing machine can't be run on freely with sync, like industrial embroidery machines. I have not yet calculated what is actual stitch/min speed, never remember calculate after program. Maybe I run some dummy program just for this.
Can't see why not make some sort of story about this and that time I definitely need some help with formatting. But first I need to finish this. Did save with .csv and noted that .txt might not be the best source for movement, easy, but it might cause problems. I get back to this and make example how this G code compares to csv or txt. It would be great if G-code comes out directly and way easier to people to get tinkering. |
|
Wow, that's a seriously high-quality result! The build is impressive, thanks for sharing. I'm sold on this, it's definitely worth creating a g-code output format for pyembroidery. I'm going to rename this issue to reflect that. Once you post an example g-code file and/or the conversion program your friend wrote, I'll write the output program and we can see if it works :) |
|
Wow, this is a really interesting project. Thank you for sharing! I did set up a page on our website. It doesn't have to stay in that place and headlines are flexible ;) If you have questions about the formatting, I'll be willing to help. Or... if you feel more comfortable to post text and images here, I could place it on the website afterwards. |
|
CLIP FROM RANDOM CSV EXPORT TO G-CODE VERSION "THIS WORKS, BUT..." This works, everything is uppercase and decimals as shown exactly. Now, let's confuse things, with arduino/GRBL G0 is not needed, it starts on rapid feed and Z5.0 can be simply Z5 Doing this as shown on code with decimal point zero (Z5.0) and every line starts with G0 will ensure this G-code will work on any controller, older controllers are really picky about format. Accuracy can be cut down to closer real world and made easier to this tiny processor, so three decimals will do. Z axis runs sewing machine, 1 stitch is equal to 5mm movement (real world one rotation), this can be adjusted from controller. Seems like good value is more than 1, so I picked 5. Actually with 1mm movement controller is not able to do proper speed ramping (more speed), so 5 it is. Every stitch adds 5 to Z value, again simplest solution. MAX speed is configured on controller, can't see any reason why move less than rapid speed. If something goes wrong, it just goes wrong quickly and this is not that fast anyway. Every program ends with M30 TO G-CODE VERSION "NICE TO HAVE" Few comment lines at the start ( ), mainly size might be interesting to know. Every G-code program starts TO G-CODE VERSION "FINAL" Final tweak, X and Y must be mirrored. I can tweak this on controller, switch axis directions, but it will cause issue when somebody else is running this or when moving hoop from computer directly. Somehow this ended looking really complicated hmm :) |
|
Awesome. Easy peasy! Do I just write the above in a text file or is there a binary format? |
|
Plain old fashioned text. |
|
awsome project Master jameskolme. i have one of those machines maybe i will
take your lead and make a Embroidery machine from your blueprints ;)
thanks for sharing
No dia domingo, 14 de outubro de 2018, jameskolme <[email protected]>
escreveu:
… Plain old fashioned text.
—
You are receiving this because you are subscribed to this thread.
Reply to this email directly, view it on GitHub
<#335 (comment)>,
or mute the thread
<https://github.com/notifications/unsubscribe-auth/AKke-r3nxH3uRNnM2IORpDdIAjEQ_QWdks5uk3Z-gaJpZM4XakVr>
.
--
Com os melhores cumprimentos,
Vinicius Silva
|
|
@jameskolme will you share your blueprints as a open source peoject? if and when you do please drop us a notice on the link to your gitproject page with the source blueprints so we can add to the link to the inkstitch webpage ;) also like i said before I am interested in replicating your project with a similar machine i have at home ;) let us know |
|
Yes, I can share those models, not sure what platform, but yes. Currently doing some redesign, to make things more user friendly and practical to use. |
|
where did you design it?
If you designed it in a parametric cad software like solid edge solid works
or fusion 360, the best format is to export it to STEP files and also
provide the STL files.
You can use the GrabCad platform to share your files it is better suited
for parametric modeling or just thinguiverse
;)
jameskolme <[email protected]> escreveu no dia segunda, 15/10/2018
à(s) 18:28:
… Yes, I can share those models, not sure what platform, but yes. Currently
doing some redesign, to make things more user friendly and practical to use.
—
You are receiving this because you commented.
Reply to this email directly, view it on GitHub
<#335 (comment)>,
or mute the thread
<https://github.com/notifications/unsubscribe-auth/AKke-p_eUyBs8Dm3c2BzO3jABa5gBhOeks5ulMXKgaJpZM4XakVr>
.
--
Com os melhores cumprimentos,
Vinicius Silva
|
|
Some designs are made with inventor, really like inventor, but currently no valid license so fusion 360 it is. Might consider Thingiverse, if it still exist, I have something on there already or should be, maybe :) |
|
Erm what I did just now, my bad, clicking everything that is clickable |
|
Inventor is pretty much the same as Fusion360 so you can export the files
and assemblies to STEP wich is more universal and allows for opening and
modification in any parametric software
jameskolme <[email protected]> escreveu no dia terça, 16/10/2018
à(s) 12:45:
… Reopened #335 <#335>.
—
You are receiving this because you commented.
Reply to this email directly, view it on GitHub
<#335 (comment)>, or mute
the thread
<https://github.com/notifications/unsubscribe-auth/AKke-nsN5Dg7FS24VoSoR-fIHjC5sxAFks5ulcbfgaJpZM4XakVr>
.
--
Com os melhores cumprimentos,
Vinicius Silva
|
|
My group and I also working on a project where gcode output would be really useful. We're retrofitting a Singer 4432 to be an automatic embroidery machine with a custom hoop controller and speed controller. What's the status on the gcode output? If no one is working on this, mind if I pick it up? |
|
Hi @rlee05, welcome to the project! So exciting, another custom made embroidery machine!! There's a working development build of the g-code output here: https://github.com/inkstitch/inkstitch/releases/tag/dev-build-lexeby-gcode-output. It may already do what you need. Of course, code contributions are enthusiastically welcome, so if it doesn't do what you need, feel free to have at it. :) At this point that code is on the master branch and it's just waiting for me to build an official release. I was planning to do a big new release in the next week or two with g-code, auto-satin, and a few bug fixes. |
|
Awesome! I'll take a look! Thanks for working on this issue so quickly :) |
|
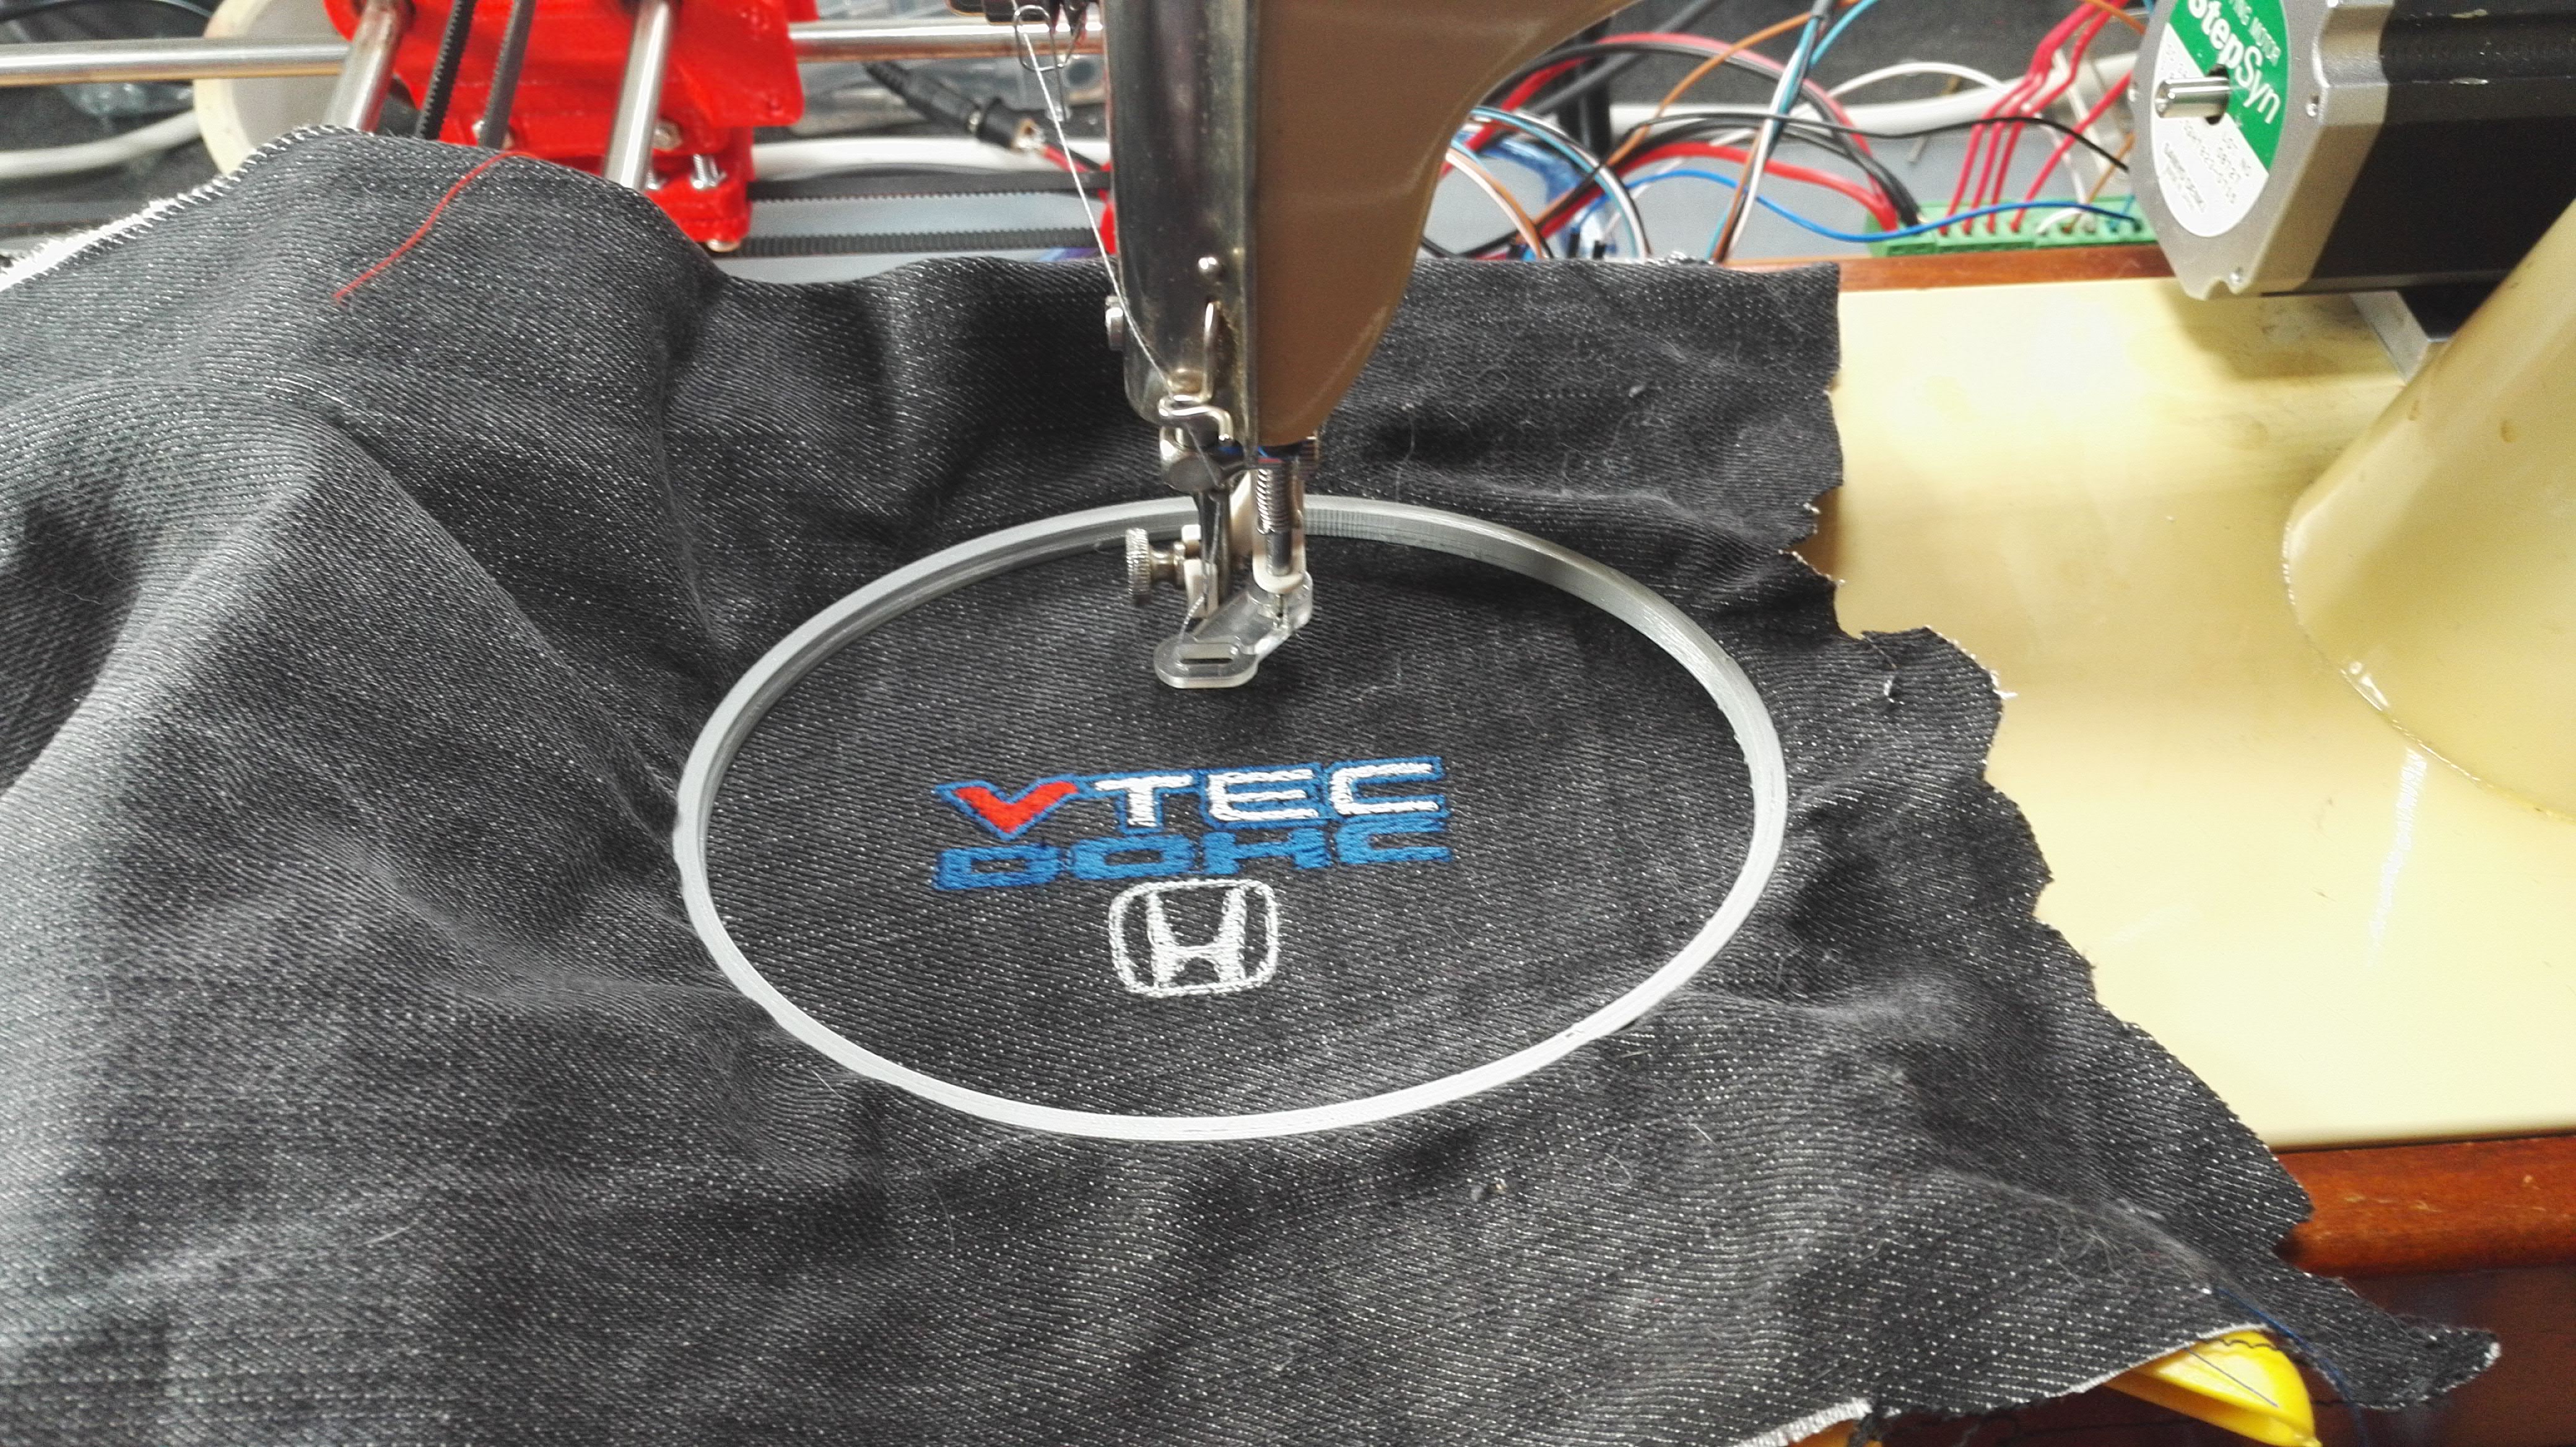
My machine is back working again after modifications. Made nearly all mistakes that can be made, but it is what was called for. Actually too small satin stitch is quite good around letters, it is just wrong place. Mainly have learned Inkscape basics and desing/print new hoops. Domestic sewing machine lost a lot of hoop space because of huge pressing foot, so little bit larger size hoops are good thing. Just my 3D printer has different opinion on this. Before this thing I didn't realize how important pressing foot is, I have 4 different embroidery feet and none of them are really that good. One showing on image, is best for results, but it wont rise high enough for hoop. I need to modify some. I wonder why nobody makes embroidery foot for diy embroidery machines and can't find book called DIY embroidery machines for dummies, it might help :) |
|
Time to write one perhaps.
If you need help setting up a github project let me know we can even
harbour the project unde inkstitch organization. Would be awsome to have a
repo for DIY embroidery machines and machne conversions since it is a
needed knowlage
jameskolme <[email protected]> escreveu no dia quinta, 25/10/2018
à(s) 10:02:
… My machine is back working again after modifications.
[image: img-20181024-wa0010]
<https://user-images.githubusercontent.com/44113605/47487386-07371f80-d84b-11e8-81d4-7102a182af3e.jpeg>
Made nearly all mistakes that can be made, but it is what was called for.
Actually too small satin stitch is quite good around letters, it is just
wrong place. Mainly have learned Inkscape basics and desing/print new
hoops. Domestic sewing machine lost a lot of hoop space because of huge
pressing foot, so little bit larger size hoops are good thing. Just my 3D
printer has different opinion on this.
Before this thing I didn't realize how important pressing foot is, I have
4 different embroidery feet and none of them are really that good. One
showing on image, is best for results, but it wont rise high enough for
hoop. I need to modify some. I wonder why nobody makes embroidery foot for
diy embroidery machines and can't find book called DIY embroidery machines
for dummies, it might help :)
—
You are receiving this because you commented.
Reply to this email directly, view it on GitHub
<#335 (comment)>,
or mute the thread
<https://github.com/notifications/unsubscribe-auth/AKke-smSuQECLQI_mmLj9WCqGwnHoJz8ks5uoX4ZgaJpZM4XakVr>
.
--
Com os melhores cumprimentos,
Vinicius Silva
|
|
Now this happened: And now back to learning inkscape some more. Near future I will write BOM, write some more and clean/rename all models. Some video might be coming, sooner or later with some assembly instructions (hopefully). Not sure what to do with chain, it just looks dangerous. Sprocket will change if I stumble on bigger stepper, but looks like we will stitch currently slow with lots of torque. I will update this topic when something happens. |


|
awsome work Master :)
No dia quinta-feira, 1 de novembro de 2018, jameskolme <
[email protected]> escreveu:
… Now this happened:
[image: p3550141]
<https://user-images.githubusercontent.com/44113605/47873857-012cda00-de1b-11e8-963c-077db315eb2c.JPG>
My style user interface
[image: p3550140]
<https://user-images.githubusercontent.com/44113605/47873866-05f18e00-de1b-11e8-9597-e9b250285bd0.JPG>
Windy day, so securing wires would be good idea
[image: p3550136]
<https://user-images.githubusercontent.com/44113605/47873925-215c9900-de1b-11e8-9f2e-0598991a7ad3.JPG>
Yep, secured oilcan.
[image: p3550138]
<https://user-images.githubusercontent.com/44113605/47873966-3a654a00-de1b-11e8-83f1-0ac88ce6abd0.JPG>
And now back to learning inkscape some more. Near future I will write BOM,
write some more and clean/rename all models. Some video might be coming,
sooner or later with some assembly instructions (hopefully). Not sure what
to do with chain, it just looks dangerous. Sprocket will change if I
stumble on bigger stepper, but looks like we will stitch currently slow
with lots of torque. I will update this topic when something happens.
—
You are receiving this because you commented.
Reply to this email directly, view it on GitHub
<#335 (comment)>,
or mute the thread
<https://github.com/notifications/unsubscribe-auth/AKke-garl784fy8ZSwxVhFvzoYevXwkFks5uq0-MgaJpZM4XakVr>
.
--
Com os melhores cumprimentos,
Vinicius Silva
|
|
That is so cool :D |
|
Some teaser or something: |
|
Wow, that totally just made my week! @kaalleen Perhaps we should link to this on the website? Ink/Stitch: the official digitizing software for DIY embroidery machines. |
|
awsome, cant wait to mod my old machine from your blueprints :)
No dia terça-feira, 6 de novembro de 2018, Lex Neva <
[email protected]> escreveu:
… Wow, that totally just made my week! @kaalleen
<https://github.com/kaalleen> Perhaps we should link to this on the
website? Ink/Stitch: the official digitizing software for DIY embroidery
machines.
—
You are receiving this because you commented.
Reply to this email directly, view it on GitHub
<#335 (comment)>,
or mute the thread
<https://github.com/notifications/unsubscribe-auth/AKke-vjRZKt7xHPKUjqQPiUEyUdDBz0yks5useOTgaJpZM4XakVr>
.
--
Com os melhores cumprimentos,
Vinicius Silva
|
|
This is a really great project! I like how you add all these details with the controller and all. @lexelby definitely yes ;) I'll do as soon as I find the time to do so. |
|
Ah, yes, I see what you mean now. That would be a useful tool, although I imagine different folks might have different ideas of what a patch edge should look like. Will require some thought. |
|
#450 created :) |
|
@aatif89 Video is very confusing, is it running just by jogging? What happens if short inkstitch program is loaded and run? It should move X,Y and Then Z, if all axes moves same time something is wrong. What you mean by autoloader? Best way to do color change is to make individual programs for each colors. Every program is based same origin, so hoop must no be touched and Z axis must be zeroed between every program. Using settings tab, enable can be used so accidentally hoop movement can be avoided easily. |
I finally tried, and it does not work when you do it "the right way". |
|
@JustGand For test purpose only, what if hard wiring enable and take step pulse from GRBL, remember to connect ground signals too. This should make it move, if not, something else is wrong. |
|
may I know what is hardwiring of a direction pin? |
|
Because sewing machines does not like to turn backward. |
|
actually I tested the Gcode on ender 3. it worked but z-axis stopped after 1 minute no movement in it. |
|
Hardwiring A4988, cut DIR pin away, so no contact to circuit board. Now solder small wire from DIR pin to logic level positive or negative, depending witch way stepper is connected. Might need to test correct direction for this. |
|
Hi jameskolme! How do you change colour?
|
|
@krsshtx I have done color change every time using different programs, program for color 1, color 2 etc... |
|
I tried to "attach commands" but didn't notice any changes in g-code.
|
|
How strong is the machine motor meant to be ? I'm no expert in Nema23 motors, but even if i have a pretty strong one (23HS45, 4,2A, 3Nm holding torque with a DM542 driver), it misses steps when there are too many stitches at the same place. BTW, here is my machine : https://youtu.be/ofgxDkFwn54 |
|
@JustGand Actually many stitches at the exact point is surprisingly hard, you probably can hear when needle and fabric keeps certain noise, like complain. Your motor should be enough, I had much smaller when I did first experiments. It is possible to get more torque out of stepper just using less micro stepping and lowering accelerating ramp, this might need some trys to get right, not exact sience. With normal stepper it is really fine balance between speed and reliability. Later I did change my stepper to so called hybrid stepper, it is driven like normal stepper but motor is looped back like servo drive, so no lost steps. This is huge step for speed and reliability, but everything can be done with normal stepper and patience. |
|
I had no 23 and they are expensive. 17-style is slow when used with gears. |
|
@jameskolme tatarize uses M00 for the Maybe we should add it too? |
|
@kaalleen Yes, that would do it. |
|
Ok, great. I've updated it accordingly. For the stop command I added a move to the stop position before it calls |
|
This project is really awesome! thanks for all the work and great ideas! |
Have you placed origin using add commands? to make one universal origin. Other common problem to me was loosing position when changing color, simply bumping canvas loop by hand. This can be avoided when setting stepper motors to active at all times. Just to make sure problem is inside gcode, you can always run program using same color without touching anything to make sure what is happening, hope this helps some. |
|
@jameskolme thanks for the hint: I tried the "set origin" with "add command" and it works! For the "zero"-position in the middle I already made a mechanical stop (I noticed that Ink/Stitch seemed to work around one zero position in the middle and had so far no idea, how to manage that with electrical homesensors). thanks, Matthias |
|
i am having an issue with setup. I have a slantomatic 500 that I would like to make an embroidery jig for with minimal change to the machine. I would prefer not to change the internal motor because this machine will sew at 1100 spm straight line zig zag what ever i throw at it. Anyway to the point I am reading through the g-code and i was hoping to locate that z could be say a switch that could be hit by the armature at the front of the machine and all timing reference for xy axis movement would then move when z switch is in n/c position and when armature leaves and switch is in n/o position then xy hold for next stich but i am not a programmer. |
|
This is a brilliant project and beautifully designed, thank you. I have just built one and it almost works however I have a major problem. I have used different pulleys to yours and am unable to synchronize the x y movement with the stitch cycle, My maths is rubbish so the prospect of me calculating this properly is minimal. Is there a trial and error method? |
|
I'm really impressed by the diy machines, and also by inkstitch itself. I would love to tinker an embroidery machine along these lines, and might get around to this if I can get time. However, I'm just thinking about the costs and how a very open and accessible design could be made. I've already got an ender-3 3D printer. These are super affordable and incredible good at what they do. It would be amazing if a project could be set up to use the motion control of one of these machines to move the frame holding the fabric. I could design a printable frame clamp that could attach to the printer's bed in an evening. I've already used Inkscape to generate gcode to run my ender 3 as a pen plotter like the guy in this youtube video: https://www.youtube.com/watch?v=NB8-BGU_9qg Now what would be AMAZING would be if the z axis signals could be disconnected from the printer and sent to a device which controls a sewing machine. (particularly if this could be done by unplugging the stepper z axis but allowing it to be reconnected to use the printer as originally intended again after) The ender3 can be bought for about £200, with all the motors and control hardware ready to go (as a 3d printer). Clever folks will argue that they can harvest all they need to make the hardware to fully DIY from old printers and scanners, but the idea I'm proposing could see enthusiastic people getting set up with all they need for a very accessible prince. If they didn't already own one, they'd get a terrific entry level 3D printer 'for free' thrown in. It would be easy to nominate a widely available sewing entry level sewing machine that could be the recommended partner. I have no expertise here, but something like the brother ls14 which is widely available used and can be purchased new for just over £100 might be good. If anyone is aware of a machine which would lend itself to this application please flag it up. If a machine has features like needle up detection that would be worth having to limit the amount of hacking required. You might end up with a huge community of users as the entry costs for people who already have the ender 3 would be low, and even those starting from nothing would be able to get going with an investment substantially lower than that of a second hand, entry level embroidery machine, and as noted above they would also get a free 3d printer thrown in. |
|
The biggest problem I can see with that is that embroidery machine is an XY bed, where most 3d printers (or things like 3018 CNC's, which I would love to have an excuse to use) have gantries for at least one axis. |
|
There is a nice GCODE sender / CAM GUI designed for GRBL called bCNC. It can show moves in colors. It can show user messages. Please see a little feature teaser :) Would you find this mod useful?
Originally posted by @apshu in inkstitch/pyembroidery#72 (comment) |


|
Great project and it inspired me to build my own out of an old 3D printer. Can I ask one question? How do you managed to change the bobbin thread to change the colour? On my machine and yours looks the same the bobbin ends up under the hoop so you cant access it while its active. Thanks |

|
if i understand well there is already no proper way to do color change ? i write a "M0" on the color change section [edit] i workaroud creatig pause command for each last color object and it worked when i write th M0 on stop section, but still nothing for the color change section in the export to gcode. there is a way to insert a pause every xx stich to change the machine spool ? and just for the eyes pleasure 😆 |

|
Hi folks! This is a really old, long conversation that's covered a lot of topics. I'm going to close this now to avoid confusion. For bugs and feature requests, would you please open separate issues? That way we can track them individually. |
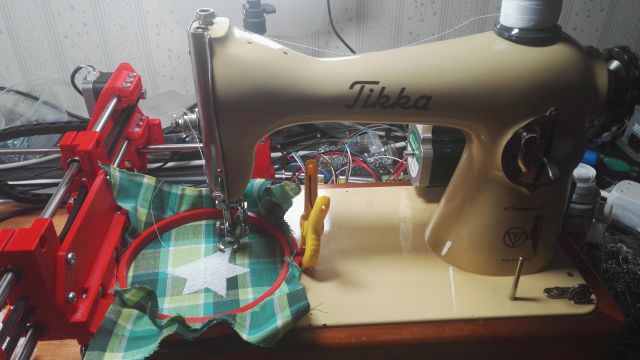
Would it be possible to get back .txt output type? What I did was, I built embroidery machine from old 1950 era sewing machine. Against all odds it actually works, slowly, but it gets the job done. With this completely nonstandard plumb of cast iron, issue is that it runs on G-code and older version inkstitch was excellent to output this .txt code. My coder friend made me little program to trans code this .txt to standard g-code, included separate line for sewing move.
The text was updated successfully, but these errors were encountered: