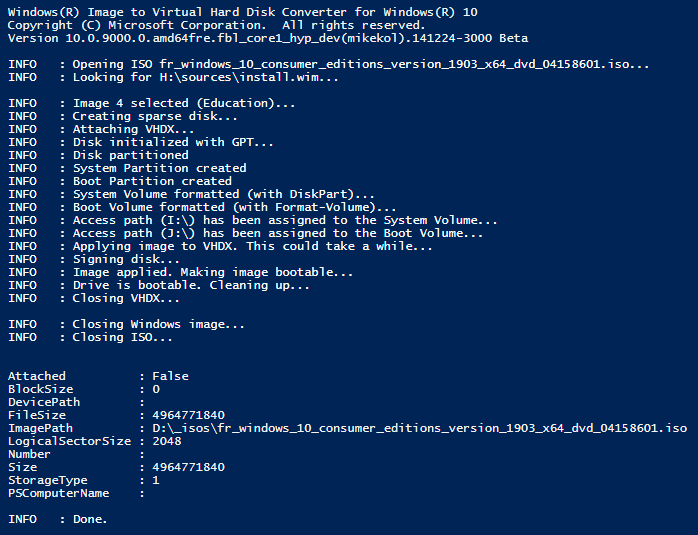
Powershell script to convert a wim from a windows install iso to a vhdx
The script is from this page : https://devblogs.microsoft.com/cesardelatorre/booting-natively-windows-10-from-a-vhdx-drive-file/
-
You need to have any Windows .ISO image, like a “Windows 10 (consumer editions), version 1903” from MSDN subscription, or any other version (any Windows 10 version). You need to put the Windows ISO file in the same folder as this script.
-
Download Convert-WindowsImage.ps1 from this repository.
-
Start the PowerShell console in administrator mode.
-
Before executing the PowerShell script, you’ll need to allow scripts executions in the policies of your machine or user. If you want to allow that at a local machine scope, run the following command in the PowerShell console. IMPORTANT, run PowerShell with Admin rights (“Run as Administrator” mode):
Set-ExecutionPolicy Unrestricted -Scope LocalMachine`- Edit the Convert-WindowsImage.ps1 file with Windows Powershel ISE (or with any editor, like sublime text or NOTEPAD can work for this) : add the following line at the end of the script (or update it with your .ISO image name and settings)
Convert-WindowsImage -SourcePath .\fr_windows_10_consumer_editions_version_1903_x64_dvd_04158601.iso -Edition Education -WorkingDirectory $pwd -VHDFormat VHDX -SizeBytes 150GB -VHDPath .\Windows10_Bootable.vhdx- Now, run the script either from Windows PowerShell ISE (with F5) or running it from a plain PowerShell command-line (In both cases with Admin privileges). Be patient, it’ll take a while as it has to copy all the files from the Windows .ISO image to the logical drive based on the .VHDX file that has been created.
- MOUNT the .VHDX as a drive in your machin
Right-click the VHDX and then mount it. In my case I got the J: as my mounted drive.
- Set the BOOT files within the .VHDX
The following steps are needed to make your computer boot from the VHDX file:
- Open an administrative command prompt via WIN+X Command Prompt (Admin)
- Type bcdboot J:\Windows in order to create the boot files in your .VHDX drive.
- Save your master image .VHDX file !
At this point you have a master image .VHDX that you could use in different machines/hardware since you still didn’t spin it up, therefore, it still doesn’t have any specific driver related to any hardware. Copy the Windows10_Bootable.vhdx somewhere else so you’d be able to re-use it in multiple machines or in the same machine but for mutiple environments.
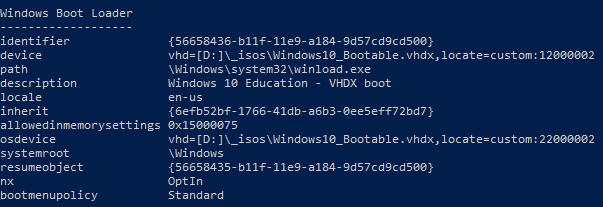
- Change the Boot Loader Description to the boot option’s name you’d like
Type again bcdedit /v, search for the boot loader pointing to the .VHDX and copy its GUID (the "identifier" value).
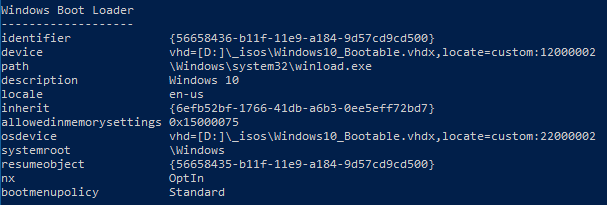 Taking that GUID identifier you can change the description in your bootlist by typing something like:
bcdedit /set "{56658436-b11f-11e9-a184-9d57cd9cd500}" description "Windows 10 Education - VHDX boot"Check again with bcdedit /v that the descrption for your new boot loader has changed:
- Re-start your computer and finish the Windows installation
If you reboot your machine, you’ll be able to select the new native Windows boot but from a .VHDX.