A proxy server that receives requests from a grafana instance, parses the request into commands made to the Scalyr api and returns the scalyr data in a grafana-friendly format
Ensure you've cloned https://github.com/AdknownInc/grafana-scalyr-datasource-plugin locally.
Modify the docker-compose.yml to:
- contain a Scalyr Read API key generated by your Scalyr account.
- Replace the SCALYR_READ_KEY value with your key
- Change the volume that contains the plugin to point your locally cloned plugin's directory. My development setup looks like this:
- ~
- projects/github.com
- grafana-scalyr-proxy-server
- grafana-scalyr-datasource-plugin
- projects/github.com
- For that reason, my volume is pointing to "../../grafana-scalyr-datasource-plugin"
- ~
- Optional: Modify DOCKER_HOST_NAME=grafanaProxy to contain a hostName that corresponds with your company's serverHost name standards.
- We'll be using this value later to verify it was installed correctly
Modify the file scalyr/agent.d/api_key.json to also have your Scalyr api key in that file.
cd into the source/ directory, run composer install
Run docker-compose up while in the docker-container directory
In your browser, navigate to http://localhost:8000 and login to grafana username: admin password: admin
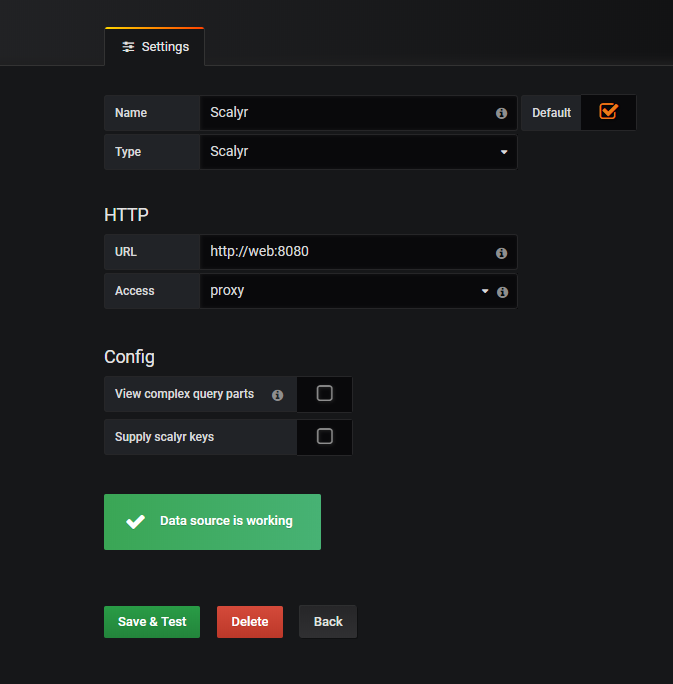
Add a datasource, the datasource'ss name is Scalyr Enter "Scalyr" for the Name
In the HTTP section, enter "http://web:8080" as the URL Set "Access" to "proxy"
Click "Save & Test"
You should see this
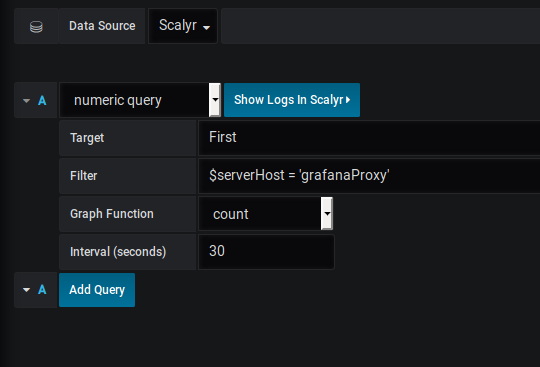
After that, create a new dashboard and add a panel Change the Data Source to Scalyr
Enter "First" as the target type (this can be any non-empty value)
Enter $serverHost = 'grafanaProxy' as the Filter
Change the Graph Function to Count
Change the Interval (seconds) to 30
At the end, you'll see this:
And that's it, you have configured the scalyr data source.
- Add a Contribution guide
- Add further documentation about numeric vs facet vs complex
- Add in a composer image to the docker-compose file so that composer is not required to get the proxy server running
- Modify complex queries from using regex to using a grammar + parser so that all queries supported by Scalyr can be entered into grafana
- Add authentication
- PHP 7.1
In it's current form, the docker-compose file is setup to also bootup a grafana instance. Unsure if it will stay this way.