Authentication & Authorization in Gauzy
From this answer on StackOverflow:
Authentication is the process of ascertaining that somebody really is who they claim to be.
Authorization refers to rules that determine who is allowed to do what. E.g. Adam may be authorized to create and delete databases, while Usama is only authorized to read.
Authentication in Gauzy is done by issuing JWT tokens.
- For restricting certain modules which only need to be available to logged-in users, we can use the AuthGuard i.e.
./@core/auth/auth.guard - All modules which fall under the
/pagesroute already have theAuthGuard. This is done inapp-routing.module.ts
{
 path: 'pages',
 loadChildren: () =>
 import('./pages/pages.module').then((m) => m.PagesModule),
 canActivate: [AuthGuard, AppModuleGuard]
}
- In the backend, authentication is achieved through Nestjs Passport Strategy.
- Any controller or route can be made "private" so that only logged-in users have access to it using AuthGuard from @nestjs/passport. This can be used before any controller or route. If used on a controller, all routes will become private.
Using AuthGuard for a controller:
@UseGuards(AuthGuard('jwt'))
@Controller()
export class CandidateController extends CrudController<Candidate>
Using AuthGuard for a single route:
@UseGuards(AuthGuard('jwt'))
@Post('/emails')
async createManyWithEmailsId(
- Gauzy uses a basic custom implementation of Role-based access control (RBAC) for Authorization.
- In short, every user has a 'role' and each role has 'permissions'.
- For any UI page, component, or backend API we can check permissions and conditionally enable/disable the pages/end-points.
- When a user logs in, the permissions are loaded & kept in the store. So to access the available permissions for a user we do not need to make an API call again. If the permissions change, the change is reflected in the next hard refresh of the page.
- There is a utility function
hasPermissionwhich can be used directly to check for permission.
The utility function can be used like:
this.store.hasPermission(PermissionsEnum.PUBLIC_PAGE_EDIT);
It is recommended to subscribe to userRolePermissions in the store and use it like this:
this.store.userRolePermissions$
 .pipe(takeUntil(this._ngDestroy$))
 .subscribe(() => {
   this.hasPermissionE = this.store.hasPermission(PermissionsEnum.ORG_EXPENSES_VIEW);
  });
- We can easily restrict APIs to only respond to users who have a certain permission using the
PermissionGuardi.e.api/src/app/shared/guards/auth/permission.guard.ts - If any controller or route has the PermissionGuard, the API will only be available when a user with that specific permission is logged in.
- It can be used like:
@UseGuards(PermissionGuard)
@Permissions(PermissionsEnum.ORG_CANDIDATES_INTERVIEWERS_EDIT)
@Delete('deleteBulkByInterviewId')
async deleteBulkByInterviewId( ...
Though there are RoleGuards available in both front-end & back-end it is highly recommended NOT to use them unless totally required.
Also, any condition like role === RolesEnum.ADMIN etc. should be thought through, double-checked and avoided at all costs, unless absolutely necessary, any such condition should go through a stringent review.
- To use google OAuth, we have to create application on your google console.
- Go to console devloper and create an application from screen.
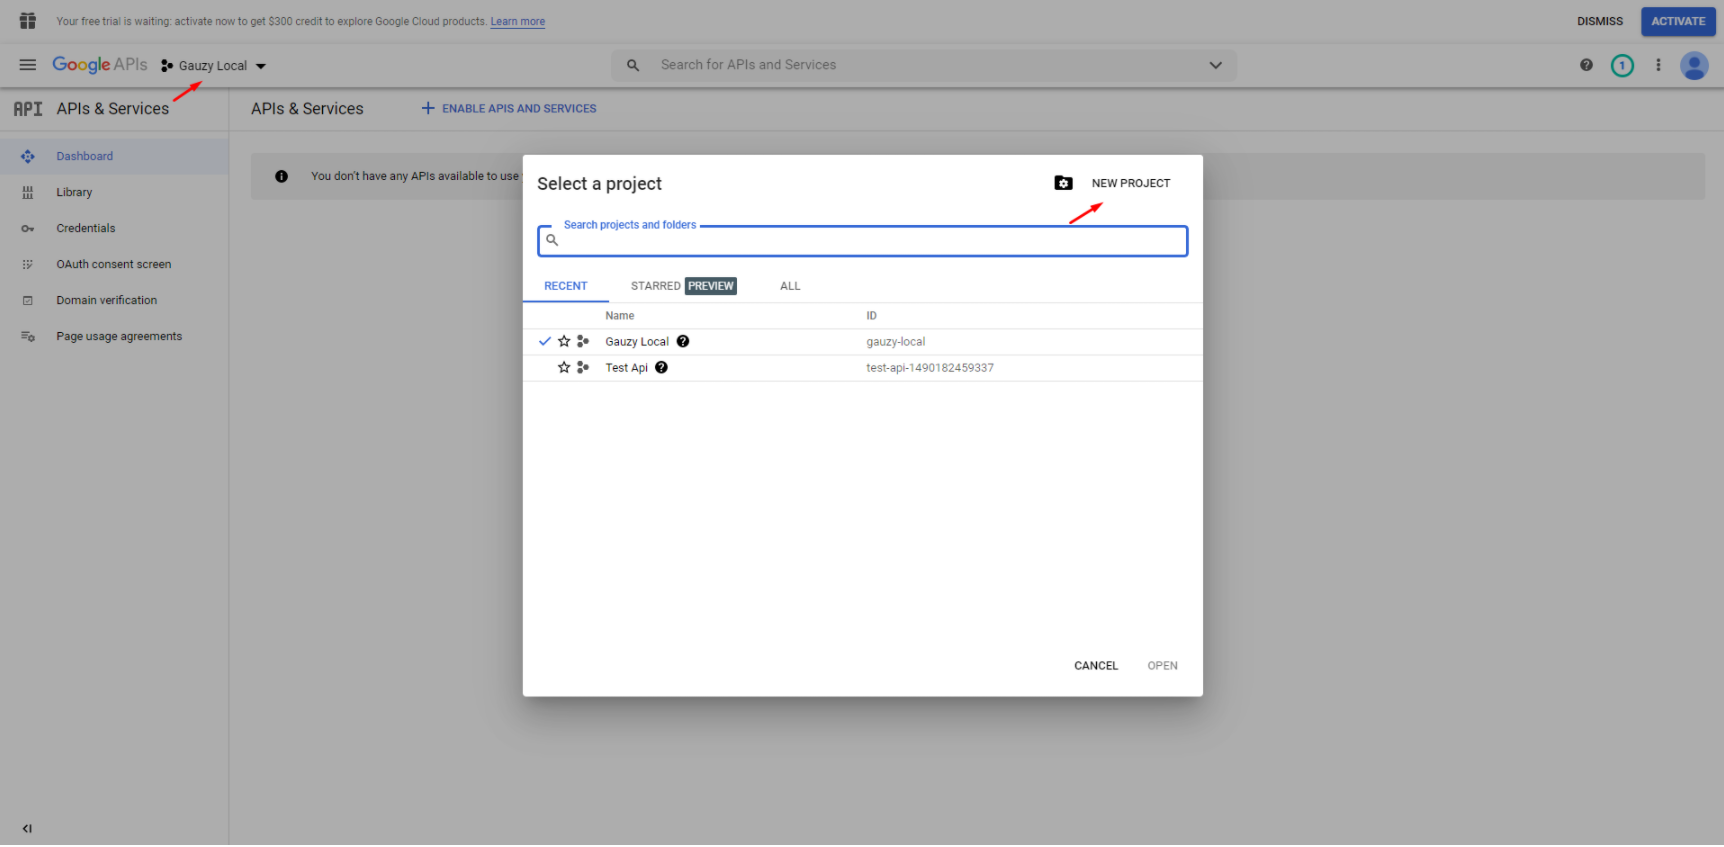
- Click on "NEW PROJECT" and fill required details and then click the "Create" button.
- Click “OAuth consent screen” menu at the sidebar from screen.

- Select "External" option so the application can be used by any google account and then click CREATE.
- On the consent screen, make sure you only fill the "App Name" and "User support email" and "Developer contact information" nothing else because this is just for testing purposes. Click "SAVE AND CONTINUE" button from screen.

To get app credentials click on “Credentials” menu at the sidebar.
- Click "CREATE CREDENTIALS" button on top header and select "OAuth Client ID" from screen.

- Select "Web applications" option from next "Create OAuth client ID" screen then fill the "Authorized JavaScript origins" and "Authorized redirect URIs" URI.

- The "Authorized JavaScript origins" refers to where our request will be coming.
i.e. Authorized redirect URIs - http://localhost:3000
- The "Authorized redirect URIs" refers to the particular endpoint in our app where google will return the response after authenticate a user.
i.e. Authorized redirect URIs - http://localhost:3000/api/auth/google/callback
- Click "CREATE" button. You should get your app credentials from the screen.

- Copy the credentials and save into the
.envfile like below or you can check into the.env.samplefile.
GOOGLE_CLIENT_ID=XXXXXXX
GOOGLE_CLIENT_SECRET=XXXXXXX
GOOGLE_CALLBACK_URL=http://localhost:3000/api/auth/google/callback
-
Login to your Facebook account and navigate to https://developers.facebook.com
-
If you not registered for Facebook developer account, then you need to register Facebook developer from https://developers.facebook.com.
-
If you were already registered for Facebook developer account, then Click on "My Apps" >> "Create App".

-
Make sure you fill all the required details from screen.

-
From the "PRODUCTS" list page click on “Set Up” button from product with name “Facebook Login”.

-
In the left side menu, click on the “Facebook Login” link to expand the sub menu. Click on “Settings” from the sub menu.

-
Please enter "Valid OAuth Redirect URIs" and "Redirect URI to Check".
-
How to get to more settings:
a) Click "Use cases" in the sidebar menu and next click button "Customize" next to "Authentication and account creation"

b) On the next page click the "Go to Settings" button

so you will see a page like below:

i.e. Valid OAuth Redirect URIs - http://localhost:3000
i.e. Redirect URI to Check - http://localhost:3000/api/auth/facebook/callback
-
Now expand the "App settings" menu and select Basic. Here you can find the App ID and App Secret.

-
There is also a "Client token" in the "Security" block in the "App settings" -> "Advanced" menu
-
Copy the credentials and save into the
.envfile like below or you can check into the.env.samplefile.
FACEBOOK_CLIENT_ID=XXXXXXX
FACEBOOK_CLIENT_SECRET=XXXXXXX
FACEBOOK_CALLBACK_URL=http://localhost:3000/api/auth/facebook/callback
Create the GitHub OAuth Application
Note: You can create and register an OAuth app under your personal account or under any organization you have administrative access to. A user or organization can own up to 100 OAuth apps.
- In the upper-right corner of any page, click your profile photo, then click Settings.

- In the left sidebar, click Developer settings.

- In the left sidebar, click OAuth apps.

- Click New OAuth App.
Note: If you haven't created an app before, this button will say, Register a new application.
- Register a New OAuth Application.

Warning: Only use information in your OAuth app that you consider public. Avoid using sensitive data, such as internal URLs, when creating an OAuth app.
- In "Authorization callback URL", type the callback URL of your app.

Note: OAuth apps cannot have multiple callback URLs, unlike GitHub Apps.
- Get App Credentials (Copy the "Client ID" and "Client Secret" from the registered OAuth application).
- Save the credentials in the .env file.
GAUZY_GITHUB_OAUTH_CLIENT_ID=XXXXXXX
GAUZY_GITHUB_OAUTH_CLIENT_SECRET=XXXXXXX
GAUZY_GITHUB_OAUTH_CALLBACK_URL=http://localhost:3000/api/auth/github/callback
Steps to configure Twiiter Application
- Go to the Twitter Developer platform at https://developer.twitter.com/.
- Sign in with your Twitter account or create a new account if you don't have one.

- Navigate to the Twitter Developer Console.
- Click on the "Projects & Apps" tab.

- Click the "Create App" button.

- Fill in the required information (name, description, developer agreement) and click "Create."
- In your app, go to the "Keys and Tokens" tab.

- Copy the API key and secret under the "Consumer API keys" section.

- Go to the "Settings" tab for your app.

- Under "App permissions," choose the appropriate level of access.

- Save your changes.
- In the "Settings" tab, go to the "Authentication settings" section.
- Enable the "3-legged OAuth" option.
- Under "App details," specify your callback URL (e.g., http://localhost:3000/api/auth/twitter/callback).

- Create a .env file in the root of your project.
- Add the following lines to the .env file:
# Twitter OAuth Configuration
TWITTER_CLIENT_ID=YOUR_API_KEY
TWITTER_CLIENT_SECRET=YOUR_API_SECRET_KEY
TWITTER_CALLBACK_URL=http://localhost:3000/api/auth/twitter/callback
Steps to configure LinkedIn OAuth Application
- Go to the LinkedIn Developer platform at https://www.linkedin.com/developers/.
- Sign in with your LinkedIn account or create a new account if you don't have one.
- Once logged in, click on the "My Apps" tab.

- Click the "Create App" button.

- Fill in the required information for your app (app name, description, and company).
- Accept the LinkedIn Developer Program Agreement and click "Create App."

- In the app dashboard, go to the "Auth" section.
- Under "Authentication Keys," note the Client ID and Client Secret. These are your OAuth credentials.

- Under the "Auth" section, find the "Redirect URLs" field.
- Add the callback URL where LinkedIn will redirect users after they grant access. Example: http://localhost:3000/api/auth/linkedin/callback.

- Under the "Auth" section, find the "OAuth 2.0 scopes" field.
- Choose the necessary permissions your app requires, such as "r_liteprofile" for basic profile information.
- Scroll to the bottom of the page and click the "Update" button to save your changes.
- In the root directory of your project, create a file named .env.
- Add the following lines to the .env file:
# LinkedIn OAuth Configuration
LINKEDIN_CLIENT_ID=YOUR_CLIENT_ID
LINKEDIN_CLIENT_SECRET=YOUR_CLIENT_SECRET
LINKEDIN_CALLBACK_URL=http://localhost:3000/api/auth/linkedin/callback
Steps to configure Microsoft Application
- Go to the Azure portal at (https://portal.azure.com).
- Sign in with your Microsoft account or create a new account if needed.
- From the portal home page, click the navigation menu, click All Services:
- On the All services page, in the navigation pane, click Identity, and then, in the primary pane, click App registrations:

- In the Azure portal, navigate to "Azure Active Directory" > "App registrations."

- On the App registrations page, click New Registration:

- Fill in the required information, including the application name and supported account types.

- In the Supported account types section, select Accounts in any organizational directory (Any Azure AD directory – Multi-Tenant and personal Microsoft accounts (e.g., Skype, Xbox):

- Set the redirect URI(s) where Microsoft will redirect users after they grant access. Typically, it's in the format http://localhost:3000/api/auth/microsoft/callback.

- After your application has been created, copy the Application (client) ID: You'll need both the client ID and the client secret in order to configure Microsoft Online as a social login provider.

- In the app registration, go to "Certificates & secrets."

- Under "Client secrets," click on "New client secret."

- Provide a description, choose an expiration, and click "Add."

- Note the generated client secret value immediately as it will not be visible again.
- In the app registration, go to "Authentication."
- Configure the platform (Web or Mobile) and set the redirect URIs.
- Save your changes.
- In the app registration, go to "API permissions."

- Click on "Add a permission" and choose the appropriate APIs (e.g., Microsoft Graph).

- Configure delegated or application permissions as needed.
- Grant admin consent if required.
- In the root directory of your project, create a file named .env.
- Add the following lines to the .env file:
# Microsoft OAuth Configuration
MICROSOFT_GRAPH_API_URL=https://graph.microsoft.com/v1.0/me
MICROSOFT_AUTHORIZATION_URL=https://login.microsoftonline.com/common/oauth2/v2.0/authorize
MICROSOFT_TOKEN_URL=https://login.microsoftonline.com/common/oauth2/v2.0/token
MICROSOFT_CLIENT_ID=YOUR_CLIENT_ID
MICROSOFT_CLIENT_SECRET=YOUR_CLIENT_SECRET
MICROSOFT_CALLBACK_URL=http://localhost:3000/api/auth/microsoft/callback